Learn how to create adorable Hello Kitty birthday invitations right from the comfort of your own home with this step-by-step guide!
One of the essential aspects of the party is the invitation. Instead of purchasing generic invitations from the store, why not make personalized Hello Kitty birthday invitations at home? Not only will this save you time and money, but it will also add a special, handmade touch to the celebration. In this article, we will guide you through the process of creating unique Hello Kitty birthday invitations that will surely impress your guests.
How Can You Incorporate a Hello Kitty Theme into Your Invitation Design?

Before we get into the nitty-gritty of incorporating Hello Kitty into invitation design, let’s first understand why this character is so popular. Hello Kitty is not just a cute cartoon character – she represents innocence, kindness, and friendship. By choosing a Hello Kitty theme for your event, you are not only adding a touch of whimsy but also conveying positive and heartfelt sentiments to your guests.
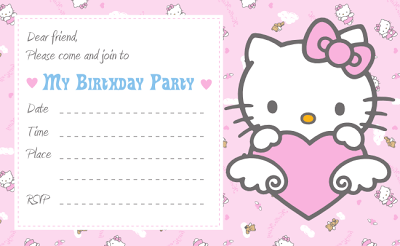
When it comes to incorporating a Hello Kitty theme into your invitation design, colors play a crucial role. The signature colors of Hello Kitty are pink and white, so incorporating these hues into your invitations is a must. You can also add pops of red, yellow, and blue to complement the theme. As for motifs, think of incorporating Hello Kitty’s bow, whiskers, and iconic face into the design. These small details can instantly bring the theme to life and make your invitations stand out.
Opt for playful and whimsical fonts that reflect the charm of Hello Kitty. Script or cursive fonts can add a touch of elegance, while bold and rounded fonts can emphasize the fun and playful nature of the theme. When it comes to text, keep it simple and sweet. Use cheerful and inviting language to entice your guests and set the tone for the event.
To take your Hello Kitty-themed invitation design to the next level, consider incorporating embellishments and extras. Add glitter or metallic accents to make the design sparkle and shine. You can also use ribbons, bows, or charms to add a tactile element to the invitations. Hello Kitty stickers, washi tape, or die-cut shapes can also add a whimsical touch. Don’t be afraid to get creative and experiment with different textures and materials to make your invitations truly one-of-a-kind.
Now that you have some ideas on how to incorporate a Hello Kitty theme into your Hello Kitty-themed invitation design, it’s time to put it all together. Start by sketching out your ideas and brainstorming different design elements. Once you have a clear vision, gather all the materials you need and start assembling your invitations. Remember to pay attention to details and add personal touches to make your invitations extra special. Whether you’re hosting a birthday party, baby shower, or any other event, a Hello Kitty-themed invitation is sure to delight your guests and set the tone for a fun and memorable celebration.
What are Some Creative Ways to Personalize Hello Kitty Invitations?
One of the easiest ways to personalize Hello Kitty invitations is by adding personal touches that reflect the style and personality of the host. You can include hand-written notes, stickers, or drawings that represent your creativity and love for Hello Kitty. You can also customize the color scheme, fonts, and design elements to make the invitations stand out.
Another creative way to personalize Hello Kitty invitations is by incorporating photos of the host or the guest of honor. You can include a cute picture of yourself wearing Hello Kitty accessories or posing with a Hello Kitty plush toy. This will not only add a personal touch to the invitations but also make them more memorable and special.
Instead of using traditional paper for your Hello Kitty invitations, consider using unique materials such as fabric, felt, or even wood. You can create fun and interactive invitations by adding tactile elements like ribbons, buttons, or beads. This will not only make the invitations visually appealing but also give your guests a sneak peek into the theme of your party.
Get creative and make your own DIY embellishments to add a personal touch to your Hello Kitty invitations. You can create paper flowers, origami bows, or hand-painted designs to make the invitations truly one-of-a-kind. DIY embellishments will showcase your crafting skills and make the invitations stand out from the rest.
Make your Hello Kitty invitations fun and interactive by adding games, puzzles, or riddles for your guests to solve. You can hide clues or secret messages within the invitations that lead to more information about the party. Interactive elements will not only engage your guests but also make the invitation-giving experience more enjoyable.
What Details Should You Include on Hello Kitty Birthday Invitations?

- First and foremost, your Hello Kitty birthday invitations should include the basics such as the date, time, and location of the party. Make sure to specify whether the party is taking place at your home, a rented venue, or any other location. Include the full address, including any special instructions or landmarks to help guests find the venue easily.
- It’s important to include RSVP information on your Hello Kitty birthday invitations so that you can get an accurate headcount for the party. Include a phone number or email address where guests can RSVP by a specific date. This will help you plan for food, activities, and party favors accordingly.
- Since you are having a Hello Kitty themed party, make sure to include design elements that reflect the theme on your invitations. Consider using Hello Kitty images, colors, and fonts to set the tone for the party. You can also include a cute message or quote related to Hello Kitty to excite your guests about the theme.
- Personalize your Hello Kitty birthday invitations by including your child’s name and age on the invitation. This will make the invitation feel special and unique to your child and their guests. You can also add a personal note or message to invite your guests warmly and make them feel welcome.
- If you have planned specific activities or games for the party, include them on the invitations so that your guests know what to expect. Whether you are having a Hello Kitty coloring station, a pin the bow on Hello Kitty game, or a Hello Kitty cake decorating activity, make sure to mention it on the invitations.
- Let your guests know what food and refreshments will be served at the party. If you are having a Hello Kitty themed cake, cupcakes, or snacks, mention them on the invitations. You can also specify if there will be any dietary restrictions or special treats for guests to enjoy.
- If you have any specific gift instructions or preferences, include them on the invitations. Whether you prefer no gifts, gifts in a specific theme, or gift cards, make sure to communicate your wishes clearly to your guests. This will help avoid any confusion or awkward moments during the party.
How Can You Print and Assemble Hello Kitty Invitations at Home?

Before you get started, make sure you have all the necessary materials on hand. Here’s what you will need:
- Hello Kitty invitation template
- Printer
- Cardstock paper
- Scissors
- Glue or double-sided tape
- Decorative stickers or embellishments
Then, you can follow these instructions:
- Start by selecting a Hello Kitty invitation template that suits your party theme. There are plenty of free templates available online that you can download and customize to fit your needs. Choose a design that best represents the style and vibe of your event.
- Once you have chosen a template, it’s time to personalize it. Add the relevant details of your party, such as the date, time, location, and RSVP information. You can also include any other special instructions or messages for your guests.
- Load your printer with cardstock paper and print the customized invitations. Make sure to adjust the printer settings to ensure the colors come out vibrant and the text is clear and legible. Once the invitations are printed, let them dry completely before moving on to the next step.
- Carefully cut out each invitation along the designated lines using a pair of scissors. This step may require some precision, so be patient and attentive as you work.
- Now it’s time to put it all together. Fold the invitation along any crease lines if applicable. Use glue or double-sided tape to secure any flaps or tabs in place. You can also add decorative stickers or embellishments to enhance the overall look of the invitation.
- Once you have completed assembling all the invitations, it’s time to send them out to your guests. Place each invitation in an envelope and address them accordingly. You can hand-deliver them or mail them out, depending on your preference.


